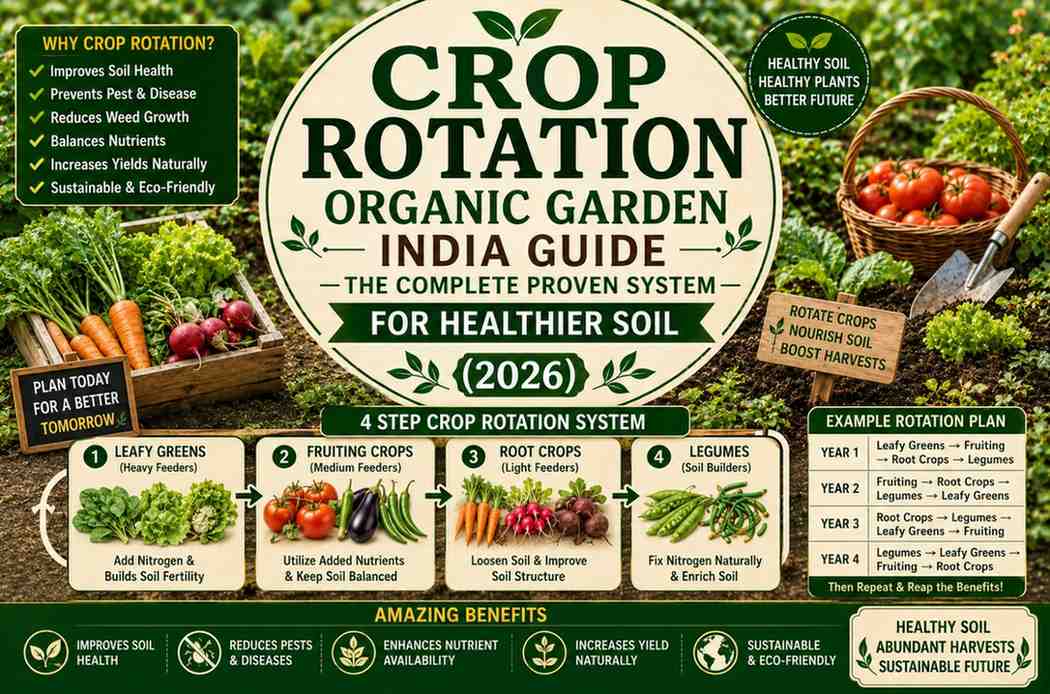
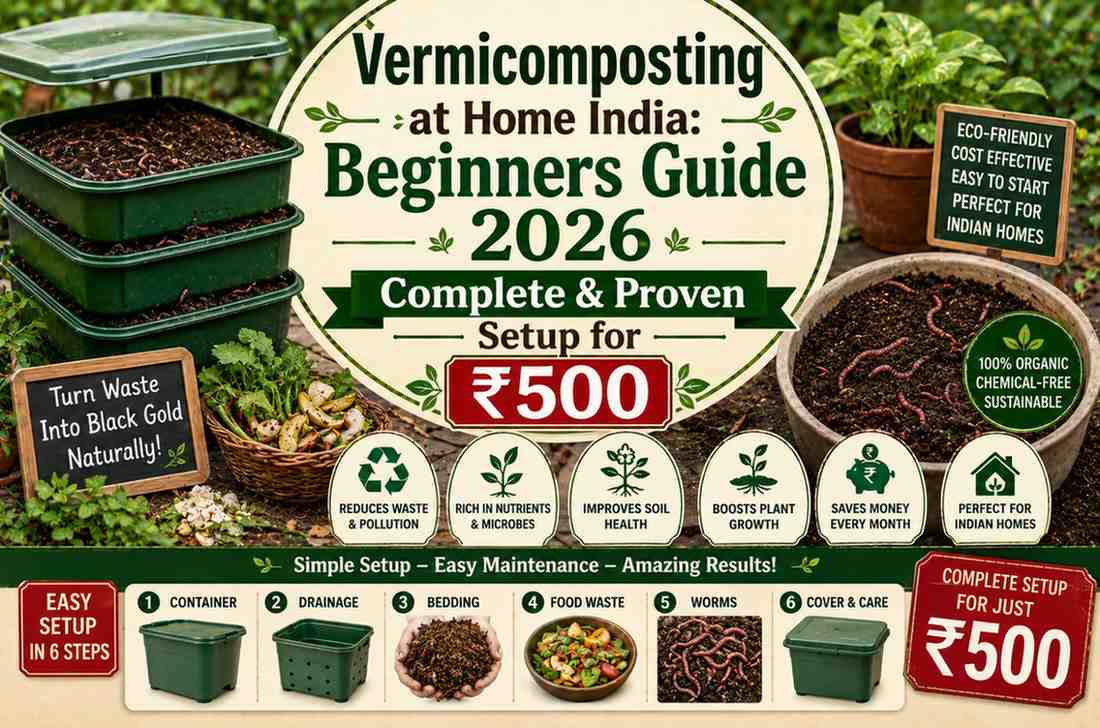
What if we told you that for ₹500 and 10 minutes of work per week, you could produce an unlimited supply of the world’s best organic fertilizer—right in your kitchen, balcony, or backyard?
Welcome to Vermicomposting at Home India: A Beginner’s Guide 2026—the complete, practical, no-nonsense guide to turning kitchen scraps into liquid gold using the most hardworking creatures on Earth: earthworms.
Vermicompost (worm castings) consistently outperforms compost, chemical fertilizers, and even many premium organic fertilizers in controlled studies. It contains higher nutrient density, plant growth hormones, beneficial enzymes, and microbial diversity than any other organic amendment available.
And you can make it at home for almost nothing.
What Is Vermicomposting?
Vermicomposting is the process of using earthworms to decompose organic waste into a rich, nutrient-dense fertilizer called vermicompost or worm castings.
Unlike regular composting (which relies on bacterial decomposition and can take 45–60 days), vermicomposting relies on worms to actively eat, digest, and excrete organic material. The process is
- Faster—21–30 days vs 45–60 days for regular compost
- Odorless—properly managed worm bins have an earthy smell, not a foul one
- More nutrient-rich—worm castings contain 5x more nitrogen, 7x more phosphorus, and 11x more potassium than ordinary soil
- Compact—worm bins can be as small as a shoebox, perfect for apartments
This vermicomposting at home India beginners’ guide 2026 will walk you through every step from setup to harvest.
Why Vermicompost Is the Best Organic Fertilizer
Research consistently shows that vermicompost stands apart from other organic fertilizers because of what worms add during digestion:
1. Plant growth hormones—Worm guts contain bacteria that produce auxins and cytokinins—hormones that actively stimulate root development, germination, and fruiting.
2. Humic acid — A soil conditioning compound that improves nutrient uptake and water retention dramatically.
3. Beneficial microorganisms — Each gram of vermicompost contains 10 billion+ beneficial bacteria and fungi.
4. Enzyme richness — Protease, lipase, amylase, and other enzymes improve nutrient cycling in soil.
5. Balanced NPK — Unlike many fertilizers that spike one nutrient, vermicompost provides a balanced, slow-release profile.
No wonder “Vermicomposting at Home: India Beginners Guide 2026” topics are among the most searched gardening terms in India.
Choosing the Right Worms for India
This is the most important decision in your vermicomposting setup. Not all earthworms make good composters!
The Best Composting Worms for India:
Eisenia fetida (Red Wiggler / Tiger Worm)
- The world’s most popular composting worm
- Thrives in organic waste, not soil
- Temperature range: 15–30°C (ideal for most Indian climates)
- Eats its body weight in organic waste per day
- Available from vermicomposting suppliers, nurseries, and online
Lumbricus rubellus (Red Earthworm)
- Also excellent for composting
- Slightly larger than Eisenia fetida
- Available in India through organic farming suppliers
Perionyx excavatus (Indian Blue Worm)
- Native to India — adapts very well to Indian conditions
- Thrives in warmer temperatures (up to 35°C)
- Faster reproduction rate than Eisenia fetida
- Excellent choice for hot states like Rajasthan, Gujarat, Maharashtra
Avoid common garden earthworms (Lumbricus terrestris)—they are soil dwellers, not surface feeders, and perform poorly in compost bins.
What You Need to Start (₹500 Budget)
Here is exactly what you need to start vermicomposting at home: India beginners guide 2026 on a ₹500 budget:
| Item | Cost | Where to Get |
|---|---|---|
| Plastic container (20–30 L) | ₹100–150 | Any local store or reuse old container |
| Drill or nail (for holes) | Free | Borrow from neighbour |
| Coconut coir / peat | ₹80–100 | Nursery |
| Dry leaves | Free | Collect from outside |
| Composting worms (100–200g) | ₹150–250 | Online nurseries, organic farms |
| Old newspaper | Free | Reuse |
| Total | ~₹330–500 |
That’s it. No fancy equipment needed. Many experienced vermicomposters use simple plastic crates they already had at home.
Step-by-Step Worm Bin Setup
Step 1: Prepare Your Container
Use a plastic tub (20–30 litres minimum) or a wooden crate.
Drill or punch holes:
- Bottom: 8–10 small holes (5–6mm) for drainage and airflow
- Sides (near bottom): 6–8 small holes for aeration
- Lid: 6–8 holes for airflow
Place the bin on bricks or wooden blocks so liquid (worm tea) can drain into a tray below. Collect this liquid—it is an incredibly powerful liquid fertilizer!
Step 2: Create the Bedding
Worms need bedding material to live in. This is their “home” between feedings.
Mix together:
- 60% moistened coconut coir (squeeze out excess water—should feel like wrung-out sponge)
- 20% dry leaves (torn into small pieces)
- 20% aged compost or garden soil (introduces microorganisms)
Fill the bin 10–12 inches deep with this bedding mix.
Moisten thoroughly—the bedding should feel like a damp sponge throughout.
Step 3: Add Your Worms
Gently add your worms to the top of the bedding. They will naturally burrow downward away from light.
Starting quantities:
- Small bin (20L): 200–300g of worms (approximately 500–800 worms)
- Medium bin (50L): 500g–1kg of worms
- Large setup: 1–2kg of worms
Let the worms settle for 3–4 days before adding food. Give them time to adjust to their new environment.
Step 4: Add Food (The Right Way)
After 3–4 days, add a small amount of food to test. Observe over 24–48 hours—if worms are actively eating, you can increase quantities.
How to feed:
- Chop or tear food into small pieces (smaller = faster processing)
- Bury food under the bedding (not on top—reduces fruit flies)
- Feed in a different spot each time (rotate around the bin)
- Add food when most of the previous feeding has been consumed
How much to feed: Start conservatively. A 20L bin with 200g worms can process approximately 100–150g of food scraps per day when fully established (takes 4–8 weeks to reach full capacity).
What Worms Can and Cannot Eat
FEED Worms:
- Vegetable peels (all types)
- Fruit scraps and peels (including citrus in small amounts)
- Tea leaves and used tea bags
- Coffee grounds
- Cooked plain rice, roti, bread (no oil/spice)
- Eggshells (crushed — adds calcium and grit)
- Paper and cardboard (torn small, moistened)
- Hair, natural fibre (cotton, jute)
DO NOT FEED:
- Meat, fish, bones
- Oily or spiced cooked food
- Dairy products
- Onions and garlic in large amounts (acidic, repelling worms)
- Salty foods
- Citrus in large quantities
- Pet faeces
Maintaining Your Worm Bin: Weekly Routine
A healthy worm bin takes just 10 minutes per week.
1. Check moisture — Bedding should feel like a damp sponge. If dry, spray with water. If too wet, add dry leaves or torn newspaper.
2. Feed appropriately—Add kitchen scraps 2–3 times per week. Bury each feeding under the bedding.
3. Check temperature—Keep between 15 and 30°C. In harsh Indian summer, move the bin indoors, under shade, or wrap it in wet jute sacking for cooling.
4. Ensure airflow — Check that drainage holes are not blocked.
5. Collect worm tea — The liquid draining from the bottom is worm tea — dilute 1:10 with water and apply to plants as an instant fertilizer.
Troubleshooting Your Worm Bin
| Problem | Cause | Solution |
|---|---|---|
| Worms trying to escape | Wrong conditions (too wet, too dry, too hot, food problem) | Check moisture and temperature; fix conditions |
| Bad smell | Too much food, wrong food, too wet | Remove uneaten food and add dry bedding |
| Fruit flies | Food left on surface | Always bury food; add newspaper layer on top |
| Worms dying | Extreme heat/cold, overfeeding, toxic food | Check temperature; reduce feeding, and remove bad food |
| Slow processing | Too cold, too few worms, too much bedding | Warm the bin, add more worms, and reduce bedding |
Harvesting Vermicompost
After 2–3 months, your bin will contain a mix of finished vermicompost (dark, grainy, earthy-smelling) and unprocessed bedding.
Harvesting methods:
Method 1: Push-to-one-side Push all contents to one side of the bin. Add fresh bedding and food to the empty side. Over 2 weeks, worms migrate to the food side. Harvest the worm-free compost on the other side.
Method 2: Light method Dump bin contents onto a tarp in bright sunlight. Worms burrow to the bottom away from light. Scoop away the top layer of finished compost. Repeat until only worms remain. Return worms to bin with fresh bedding.
Method 3: Harvest from bottom (2-bin system) Use two stacked bins with holes in the bottom of the upper bin. When the lower bin is full, place the upper bin on top and add food only to the upper bin. Worms migrate up through the holes over 2–3 weeks. Harvest the lower bin completely.
How to Use Vermicompost
- Potting mix: Mix 15–20% vermicompost into your potting soil
- Top dressing: Apply 1–2 inches around plant base every 4–6 weeks
- Seed starting: Mix 10–15% into seed starting mix
- Liquid fertilizer: Soak 1 cup vermicompost in L water for 24 hours; use the liquid
IMAGE SUGGESTION 1:
Placement: After Step 2 (Creating the Bedding) Description: Inside of a plastic vermicomposting bin showing moist peat bedding with red wiggler worms visible ALT Text: “vermicomposting at home: India beginners’ guide 2026 — worm bin setup with peat bedding”
IMAGE SUGGESTION 2:
Placement: After the harvesting section Description: Hands holding dark, grainy vermicompost with a worm bin and vegetables in the background. ALT Text: “vermicomposting at home: India beginners’ guide 2026 — finished vermicompost harvest from worm bin”
Authority External Resources
- National Centre of Organic and Natural Farming — Vermicompost — India’s official guide on vermicomposting standards and methods.
- ICAR — Vermicompost Research India — Indian agricultural research on vermicomposting effectiveness.
- Cornell Composting — Vermicomposting Guide — Science-backed university guide to worm composting.
- Worm Digest — Dedicated vermicomposting resource with troubleshooting guides.
- FAO — Organic Inputs — International guidance on organic soil amendments, including vermicompost.
FAQs: Vermicomposting at Home India: A Beginner’s Guide 2026
Q1. Can I do vermicomposting in a flat or apartment in India? Absolutely! A properly managed worm bin is odourless and compact. A 20-litre plastic tub fits under the kitchen sink or on a balcony corner. Many urban Indians successfully maintain worm bins in apartments in Mumbai, Bengaluru, Chennai, and Delhi.
Q2. How do I keep the worm bin cool in Indian summers? Move the bin to the coolest indoor spot. Wrap it in wet jute sacking or old newspaper. Place frozen water bottles near (not in) the bin in extreme heat. Ensure good airflow. Perionyx excavatus (Indian Blue Worm) is more heat-tolerant and better suited for hot regions.
Q3. Where can I buy composting worms in India? Online: platforms like Ugaoo, TrustBasket, and Amazon India sell composting worms. Also check local organic farming groups on Facebook and WhatsApp — many experienced vermicomposters share starter cultures for free or at very low cost. Agricultural universities sometimes distribute worms at subsidized rates.
Q4. How long does it take to get vermicompost from a new bin? Your first harvest of finished vermicompost will typically be ready 8–12 weeks after starting a new bin. After the initial setup period, the system runs continuously — you can harvest partially and leave the worms to continue processing.
Q5. Is worm tea (leachate) the same as vermicompost tea? No. Worm tea (or leachate) is the liquid that drains naturally from the bottom of the bin. It is useful but should be diluted 1:10 before using. Vermicompost tea is made by steeping finished vermicompost in aerated water for 24 hours and is more potent and microbially rich.
Conclusion
Vermicomposting at home: India beginners’ guide 2026 proves that the best things in gardening are often the simplest. A ₹500 setup, 200 hardworking worms, and your daily kitchen scraps—that’s all you need to create an unlimited supply of the world’s finest organic fertilizer.
Your worm bin will process waste, eliminate the need for purchased fertilizers, and feed your garden with nutrients and biology that no chemical product can replicate.
Set up your bin this weekend. In 8 weeks, your first harvest of dark, crumbly vermicompost will be ready — and your plants will never look back.