 editer@organickheti.in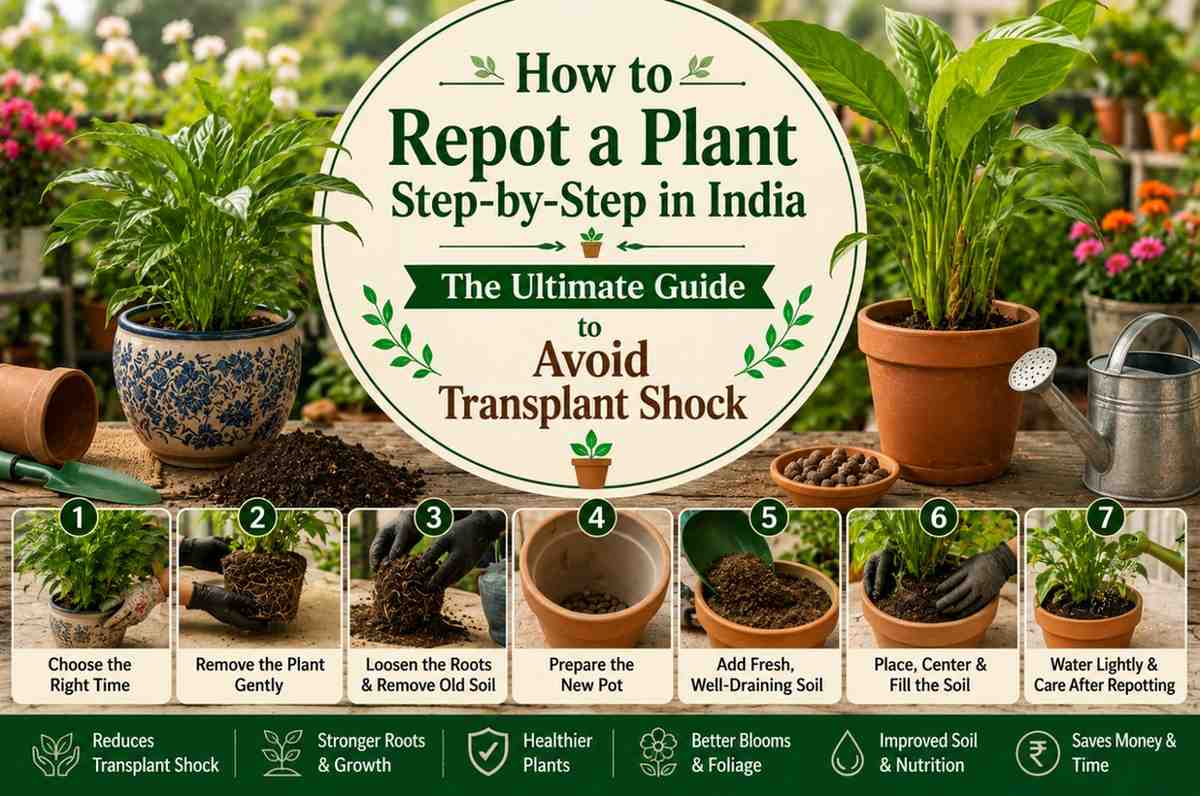
Have you ever watched a plant slowly stop growing, despite regular watering and feeding? The leaves look dull, the roots are poking out of the drainage holes, and the soil dries out within hours of watering.
Your plant is not sick. It is rootbound—and it desperately needs a bigger home.
Knowing how to repot a plant step-by-step in India is one of the most important skills for any plant parent. Done correctly, repotting gives your plant room to breathe, fresh nutrients, and a new burst of growth. Done incorrectly, it causes transplant shock that can set a plant back by months — or kill it entirely.
This complete guide walks you through every step, every tool, every mistake to avoid, and every soil tip specific to India’s climate and locally available materials.
Why Repotting Matters More in India
India’s climate — high humidity in coastal regions, intense summer heat inland, and wide temperature swings — accelerates root growth and soil degradation.
Here’s why how to repot a plant step-by-step in India is especially relevant in the Indian context:
- Fast root growth — Warm temperatures year-round mean plant roots grow faster in India than in colder climates.
- Soil degradation—Cocopeat-based potting mixes (widely used in India) compact and lose structure faster than peat-based mixes used in Western countries.
- Salt buildup — Hard water (high TDS) common in Indian cities leaves mineral deposits that damage roots over time. Repotting with fresh soil removes this buildup.
- Fungal issues—High humidity in the Indian monsoon season causes old, compacted potting mix to harbor fungal pathogens. Fresh soil at repotting time resets this.
Signs Your Plant Needs Repotting
Before you learn how to repot a plant step by step in India, you need to know when to do it. Watch for these clear signals:
🌿 Root Signs:
- Roots circling the bottom of the pot (visible through drainage holes)
- Roots growing out of drainage holes — the most obvious sign
- Root ball visible at soil surface — roots pushing up through the top
🍃 Plant Health Signs:
- Plant wilts within 24 hours of watering (rootbound soil holds almost no moisture)
- Stunted or zero new growth despite adequate sun, water, and fertilizer
- Yellowing lower leaves without other obvious cause
- Soil drying extremely fast — within a day of watering
- Pot cracking or deforming from root pressure (especially terracotta pots)
⏰ Time-Based Signs:
- The plant has been in the same pot for 2+ years
- You bought it from a nursery and it has been in the same nursery plastic bag or black pot for more than 6 months
- The potting mix smells stale or sour (old, decomposed soil)
If you see 2 or more of these signs, it’s time to learn how to repot a plant step by step in India.
When Is the Best Time to Repot Plants in India?
Timing matters enormously. Repotting at the wrong time stresses the plant unnecessarily.
Best Seasons to Repot in India:
February–March (Late Winter/Pre-Summer) This is the ideal repotting window for most plants in India. The weather is mild, plants are entering their active growing season, and they have the energy to establish new roots quickly.
September–October (Post-Monsoon) The second-best window. Temperatures drop after monsoon heat, and plants bounce back quickly before the mild winter.
Seasons to Avoid:
April–June (Peak Indian Summer) Extreme heat (40–45°C in many states) plus the stress of repotting is a dangerous combination. Plant roots cannot recover quickly in this heat. Avoid unless the plant is in crisis.
July–August (Peak Monsoon) High humidity + wet soil + repotting = fungal root rot risk. Avoid unless necessary.
December–January (Winter in North India) Cold slows root establishment. Plants repotted in peak winter in North India (Delhi, Punjab, UP, Rajasthan) take far longer to recover.
Tools and Materials You Need
Gathering everything before you start is essential for a smooth repotting experience. Here is the complete checklist for how to repot a plant step-by-step in India:
Tools:
- Trowel or small spade — for soil handling
- Pruning scissors or secateurs — for trimming damaged roots
- Old newspaper or tarp — to work on (reduces mess)
- Watering can — with a gentle rose attachment
- A stick or chopstick—for pressing soil into gaps
Materials:
- New pot — 1–2 inches wider in diameter than the current pot
- Fresh organic potting mix (see recipe below)
- Drainage material — small pebbles, broken terracotta pieces, or neem cake
- Rooting hormone powder (optional but helpful for sensitive plants)
The Perfect Organic Potting Mix for Indian Repotting:
| Ingredient | Proportion | Purpose |
|---|---|---|
| Garden soil / red soil | 35% | Base structure |
| Vermicompost | 25% | Nutrition + microbial life |
| Coco peat | 25% | Moisture retention + aeration |
| River sand or perlite | 15% | Drainage |
| Neem cake | 100g per 10L | Pest + disease prevention |
Mix thoroughly and moisten slightly before use.
How to Repot a Plant Step-by-Step India — The Complete Process
Step 1: Water the Plant 24 Hours Before Repotting
Water your plant thoroughly the day before repotting. This serves two important purposes:
- Hydrates the plant—well-hydrated plants recover better from repotting stress
- Loosens the root ball—moist soil releases from the pot walls more easily, reducing root damage
Do NOT repot a bone-dry plant—the stress of dry roots plus transplanting is often fatal.
Step 2: Prepare Your New Pot
Choose a new pot that is only 1–2 inches larger in diameter than the current pot.
Bigger is NOT better. A pot that is too large holds excess moisture the roots cannot absorb—leading to root rot.
Prepare drainage:
- Ensure the new pot has drainage holes (absolutely essential)
- Place a piece of mesh, broken pottery shard, or coconut coir piece over the drainage hole to prevent soil washing out
- Add a 1-inch layer of small pebbles or broken terracotta at the bottom
Never use stones as a thick drainage layer — this is a common myth. A layer of stones actually raises the perched water table, increasing root-rot risk. A thin layer (1 inch max) is sufficient.
Step 3: Remove the Plant From Its Current Pot
This is the step where most people cause damage. Be slow and gentle.
For plastic pots: Squeeze the sides of the pot gently all around to loosen the root ball from the walls. Then tip the pot sideways, support the plant base with your other hand, and slide the plant out.
For terracotta pots (common in India): Run a thin knife or stick around the inside edge of the pot to detach the root ball from the walls. Tip the pot and gently ease the plant out.
Stubborn root balls: If the plant won’t come out, do NOT pull from the stem. Tap the pot’s bottom firmly. As a last resort, carefully break a plastic pot rather than yanking the plant.
Step 4: Inspect and Trim the Root Ball
Once out, examine the roots carefully. This is a critical step in how to repot a plant step by step in India.
What you’re looking for:
✅ Healthy roots: White or light tan, firm, and slightly flexible — leave these completely undisturbed.
❌ Dead roots: Brown or black, mushy, hollow, or with an unpleasant smell — trim these with clean, sharp scissors.
❌ Circling roots: Roots that have grown in circles following the pot shape—gently untangle with your fingers or use scissors to make 3–4 vertical cuts through the outer root ball (called “scoring”). This encourages outward growth in the new pot.
❌ Root rot: If you see extensive brown mushy roots (more than 30% of the root ball), treat with a diluted neem oil solution (5 ml per liter of water) before repotting.
After trimming, dust cut ends lightly with rooting hormone powder or ground cinnamon (a natural antifungal widely available in India).
Step 5: Add Fresh Potting Mix to the New Pot
Add enough fresh potting mix to the new pot so that when you place the plant inside, the top of the root ball sits 1–2 inches below the rim of the pot. This space is essential for watering without overflow.
Do not pack the soil at the bottom — leave it loose so roots can penetrate easily.
Step 6: Place the Plant in the new pot.
Center the plant in the new pot. Hold it upright and begin filling in the sides with fresh potting mix.
Fill in layers, gently pressing the soil around the root ball with your fingers or a chopstick to eliminate large air pockets. Air pockets around roots cause them to dry out and die.
Do not bury the plant deeper than it was in the original pot. The base of the stem should be at the same soil level as before. Burying the stem causes stem rot—a very common and fatal mistake.
Step 7: Water Thoroughly and Gently
After repotting, water the plant thoroughly until water drains freely from the bottom.
Use a gentle watering can rose (shower head attachment)—direct, strong water flow can dislodge the plant or compact the new soil.
The goal is to settle the soil around the roots and eliminate remaining air pockets.
Do NOT add fertilizer at this stage. Fertilizing immediately after repotting burns the already-stressed fresh roots. Wait at least 3–4 weeks before feeding.
Step 8: Place in a Sheltered Spot
After repotting, move the plant to a bright but indirect light location for 1–2 weeks.
Even sun-loving plants should be shielded from direct harsh sunlight for the first 2 weeks post-repotting. The plant is focused on establishing new roots—it cannot handle maximum photosynthesis demand simultaneously.
In Indian summer, this is especially important. Move repotted plants indoors or under shade cloth for their recovery period.
How to Avoid Transplant Shock
Transplant shock is the wilting, leaf drop, and growth stall that happens after repotting. Here’s how to prevent it in the context of how to repot a plant step-by-step in India:
Before Repotting:
- ✅ Water 24 hours before
- ✅ Repot in the morning or evening (never in midday heat)
- ✅ Work in shade
During Repotting:
- ✅ Minimise time roots are exposed to air (work quickly)
- ✅ Never let roots dry out — mist if needed
- ✅ Handle roots gently
- ✅ Don’t bury the stem deeper than before
After Repotting:
- ✅ Water immediately and thoroughly
- ✅ Keep in indirect light for 2 weeks
- ✅ Mist leaves daily for first week (especially in dry climates)
- ✅ Do NOT fertilize for 3–4 weeks
- ✅ Do NOT repot again for at least 6 months
Anti-Transplant Shock Treatment (Indian Home Remedy):
Mix 1 tbsp honey + 1 tbsp aloe vera gel in 1 liter of water. Water the plant with this solution immediately after repotting. Honey contains natural sugars and antimicrobial compounds; aloe vera contains plant hormones (auxins and gibberellins) that stimulate root development. This traditional-meets-science approach significantly reduces transplant shock.
Repotting Guide for Specific Popular Indian Plants
| Plant | Repot Frequency | Pot Size Increase | Special Note |
|---|---|---|---|
| Money Plant (Pothos) | Every 1–2 years | 1–2 inches | Very forgiving—hard to kill during repotting |
| Peace Lily | Every 1–2 years | 1–2 inches | Likes being slightly rootbound |
| Snake Plant | Every 2–3 years | 1–2 inches | Tolerates rootbound conditions well |
| Fiddle Leaf Fig | Every 1–2 years | 2 inches | Very sensitive—avoid root disturbance |
| Rose | Every 2 years | 2–3 inches | Prune roots and stems by 1/3 at repotting |
| Tulsi | Every year | 2 inches | Very fast root growth in Indian climate |
| Rubber Plant | Every 2 years | 2 inches | Prefers being slightly rootbound |
| Monstera | Every 1–2 years | 2–3 inches | Choose pot with drainage holes only |
Post-Repotting Care: The First 30 Days
Days 1–7:
- Indirect light only
- Daily gentle misting of leaves
- Water only when top 2 inches of soil are dry
- Do not fertilize
Days 7–14:
- Gradually introduce to normal light conditions
- Continue gentle watering
- Watch for new growth (sign of successful establishment)
Days 14–28:
- Return to normal light and care routine
- Begin fertilizing only if new growth is visible
- Start with diluted liquid fertilizer (half strength)
Day 30+:
- Normal care routine resumes completely
- Enjoy the new growth burst that healthy repotting brings!
📷 Image Suggestion 1:
Placement: After the tools and materials section Description: Flat lay of repotting tools on newspaper—terracotta pot, fresh soil mix, trowel, pruning scissors, cocopeat bag on Indian balcony ALT Text: “how to repot a plant step by step India—repotting tools and organic soil mix laid out ready”
📷 Image Suggestion 2:
Placement: After Step 4 (root inspection) Description: Close-up of hands gently inspecting plant root ball showing healthy white roots vs dark damaged roots being trimmed ALT Text: “how to repot a plant step by step India — inspecting and trimming root ball before repotting”
Authority External Resources
- National Horticulture Board India — Official Indian government resource on horticulture and plant care guidelines.
- ICAR — Plant Physiology and Root Health — Research-backed guidance on root health and transplanting in Indian conditions.
- Royal Horticultural Society — Repotting Guide — World-leading horticultural authority on repotting techniques.
- Krishi Jagran — Plant Care India — India’s leading agricultural media platform with practical plant care advice.
- University of Florida IFAS — Transplant Shock — Science-backed guide on avoiding and treating transplant shock in plants.
FAQs: How to Repot a Plant Step-by-Step India
Q1. How do I know if my plant is in transplant shock after repotting? Signs of transplant shock include wilting (even when soil is moist), leaf yellowing or dropping, and complete growth stall. Mild shock resolves within 1–2 weeks with proper care—indirect light, consistent moisture, no fertilizer, and daily misting. Severe shock (more than 50% leaf loss) may need the anti-shock honey-aloe treatment and several weeks of patient care.
Q2. Can I repot a flowering plant? It is best to avoid repotting during active flowering. Repotting redirects the plant’s energy from flowering to root establishment—which usually causes flower and bud drop. Wait until the flowering cycle is complete, then repot in the post-flowering recovery period.
Q3. What is the best pot material for Indian conditions — terracotta or plastic? Both have advantages. Terracotta allows air exchange through its walls and is excellent for plants prone to overwatering (cacti, succulents, snake plants). However, it dries out faster — a disadvantage in peak Indian summer. Plastic pots retain moisture longer and are better for moisture-loving plants. For Indian conditions, terracotta is generally preferred for its breathability.
Q4. My plant’s roots are coming out of the drainage holes, but the plant looks healthy—do I still need to repot? Roots emerging from drainage holes are the clearest signal that repotting is needed, even if the plant looks healthy on top. A plant that appears healthy but is severely rootbound is living on borrowed time—it will decline rapidly once the roots have nowhere else to go. Report at the next appropriate seasonal window.
Q5. Can I reuse old potting soil when repotting? Old potting soil from a healthy plant can be reused with amendments. Remove it from the pot, mix in 30–40% fresh compost or vermicompost, add neem cake (100 g per 10 liters), and moisten. Do NOT reuse soil from a plant that had root rot, fungal disease, or severe pest infestation—this soil will infect the repotted plant immediately.
Conclusion
Knowing how to repot a plant step-by-step in India is the difference between a plant that merely survives and one that truly thrives.
The process is straightforward: recognize the signs, choose the right season, gather fresh organic soil mix, handle the roots gently, plant at the correct depth, water in thoroughly, and give the plant time to recover in a sheltered spot.
Your plant has been living in a cramped space, exhausted soil, and depleted nutrients. Repotting is an act of care—a gift of space, fresh nutrition, and renewed potential.
Pick up your trowel, prepare your soil mix, and give your plant the new home it deserves. The growth spurt that follows will be your reward.